Dynamic Membership in M365: Translating Checkboxes in PowerSchool to License Assignments in M365
Manual account management = technical debt
Once upon a time, we had a problem that whenever a new staff member was added, we had to manually assign their Microsoft 365 account license before they could access their products. We had a process using Classlink’s OneSync product where user accounts would be created automatically after being created in PowerSchool, but nothing to provide access to email, Office, and the like. Naturally, we wanted to bridge the gap to also include automated application of M365 licenses. This article focuses on using Dynamic Membership to assign Microsoft licenses, but the underlying process is infinitely reusable. We follow this basic process for assigning access for users in many of our platforms that use M365 for SSO. Door access controls? Panic buttons? Software deployments in Intune? Dynamic groups are at the heart of how you can manage those products without having to manually add and remove users every day.
Pre-Requisites
Every environment is different, so below is the landscape of what was in place before we began this process.
First, using Classlink OneSync, we established an automated process for provisioning Active Directory accounts
We used Data Transforms in OneSync to include site and role information from PowerSchool in the Extension Attribute fields in Active Directory. That way, every new user added to PowerSchool is provisioned in Active Directory with the following attributes:
Student, Certified Staff, or Classified Staff
Site Location
Department (if applicable)… picture auto-deploying department-specific software to HR, Finance, etc.
Account enabled or disabled?
The data in Active Directory is then synced to Entra ID using either Entra Connect Sync or Entra Cloud Sync.
Dynamic Groups
To automate group assignments, go to Azure → Entra ID → Groups → +New Group. Select Security as the group type, name the group, and toggle the Membership type to Dynamic. Finally, click Add dynamic query.
On the Dynamic Membership Rules page, you can use the query builder to build rules based on Entra account information (that synced from PowerSchool to Active Directory to Entra). The query builder is very easy to use as long as you know which attributes you want to use to build your groups. If you already have the syntax, you can skip the builder and click on Edit over the Rule syntax box and type or paste your rule there. I usually use the builder on my first group, and then copy, paste, and edit for the rest. As a word of caution, be careful with your Boolean operators… Using or in particular can lead to your rule casting a wider net than you really want when building the group.
After building the query, click Validate Rules and see if the rule acts how you’d expect. I usually pick a couple of teachers at the school who I expect to be added to the group, but conversely, I try to pick a few people who definitely should NOT be a member… I usually test a mix of different roles and locations.
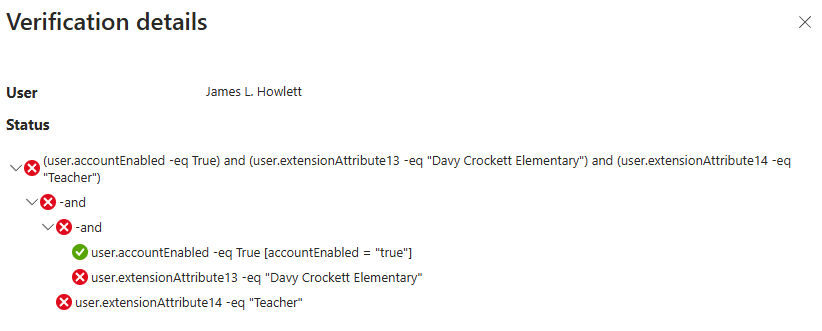
If there is an unexpected outcome, click on View details to see what part of your logic failed. In James Howlett’s case, his account was enabled, but he didn’t include the correct school or the teacher attribute.
Once you have your group automatically populating with the people you want to have automatically populated, you’re ready to assign licenses to the group.
While you’re still on the group’s page in Azure, if you click on the Licenses tab in the left-hand navigation of the group you’ll see the current license status of your group. At this point, there should be no licenses assigned.
To assign licenses, we’ll need to head to the M365 Admin Center then Billing —> Licenses. Select the appropriate license (here, we’ll do A1 for Faculty):
Next, you’ll click on Groups then +Assign Licenses. Search for the group you created. It will then give you the option to turn apps and services on or off. The most common use case for this with us is Microsoft Teams, which we don’t use with students. We toggle off the Teams app for any student groups we’re assigning licenses to. For this example, we’ll toggle off “Yammer” for Faculty. After you have the correct apps and services selected, click Assign.
You should now be able to see the license assignment in M365 Admin.
This view will also show us if there are any issues with license assignments. In this case, Oliver Queen had already been assigned a license, and it creates a conflict that prevents us from assigning the license. To resolve this, you’ll need to remove the existing license. If you’re juggling multiple dynamic groups for licensing, you may need to get creative with logic when these conflicts appear. When troubleshooting these types of conflicts, the Validate Rules tab inside the dynamic group is essential.
Wrapping Up
As you put the finishing touches on automatic license assignments, one of the goals you should work towards is making sure EVERY license assignment happens automatically. For us, we had a lot of bizarre, band-aid scenarios where we were manually creating accounts for specific types of users, and manually assigning licenses. This introduces tons of technical debt and is an absolute nightmare to manage. Our goal was 100% automation—no manual licensing, no workarounds. Once we achieved that, daily account management became hands-off, requiring intervention only for rare exceptions.


