

Creating a Safe Space for Web Browsing and Checking Out Hinky Links
KASM pt 1: Using a Container Streaming Platform to Isolate Your Web Activity and Protect Your Computer


Is it ok to click the link? What could go wrong?
As the largest attack vector that we encounter everyday, links in phishing emails or on hinky websites are not a problem that’s going away any time soon. There are some dynamic analysis tools like Any.Run and urlscan.io that help you analyze a link or see screenshots of the page, but it’s not practical to apply to every link you visit, and definitely not practical for general web browsing.
Enter KASM Workspaces. KASM - in their own words - is a container streaming platform, meaning it’s a place where you can spin up and run a container (or self-contained application) on a server somewhere that will stream to your browser. This provides you with browser isolation, meaning you can browse the web, and if anything malicious happens on the link you click, it’s stuck in the container on the server and can’t escape to your own browser or the operating system of your computer. It can also add layers of privacy to your browsing (more on that in another post).
Installation
Installing KASM on a self-hosted server is very straightforward. Start with a basic Linux server like Ubuntu Server 22.04 LTS. When setting up the server, don’t skimp on memory. Web browsers are memory intensive, so roughly plan on 4GB of RAM for every concurrent user you expect.
Start things off:
sudo apt update && sudo apt upgrade -y
Change directory to temp:
cd /tmp
Download the KASM package:
curl -O curl -O https://kasm-static-content.s3.amazonaws.com/kasm_release_1.16.1.98d6fa.tar.gz
Unzip it:
tar -xf kasm_release_1.16.1.98d6fa.tar.gz
Run the install script:
sudo bash kasm_release/install.sh
IMPORTANT: When KASM installation finishes, the last text displayed on your terminal will be all of the login credentials for a KASM user, admin, database, etc. Be sure to save these and keep them safe in your password manager or other secure location.
Accessing KASM
To access KASM locally, you’ll need to know your server’s IP address. You can find this either in your hypervisor dashboard, or running the ifconfig or ip a command from the server.
Next, open a browser from another computer on your network and go to https://ip.ad.dr.ess:443 (substituting the IP address you found in the previous step)
The KASM login page should show up:

Login using the admin credentials that were displayed on your terminal during the last step of KASM installaton (admin@kasm.local and a unique password).
To login as a KASM user, you use the same portal but use the user@kasm.local credentials you were provided during install.
The first thing I would do after being able to login is login as the admin user and create a new user account for yourself, and then add that user to the Administrators group. Next, disable the default admin and user accounts like below (Access Management —> Users):

Aside from being a general best practice, this will provide you with an easy way to toggle betwen your Administrator and User accounts like below:

Using KASM
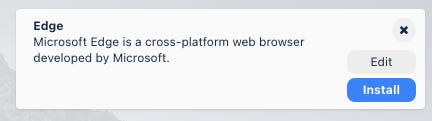
While signed in as an administrator, you’ll need to add some containers for your users to choose from. Go to Workspaces —> Registry and click on the container you’d like to add. There are a lot of options (including Doom, Kali Linux, and a Mario Kart spinoff), but for our purposes we’re going to add Edge, Chrome, and Firefox.

When you click on an option like Edge, the tile will flip over and you can click Install.
Once you’ve installed a Workspace from the Registry, it will be available to users. If you created a new account, you can switch from admin to user by clicking on the Workspaces icon at the top of the page. If you are using the default admin@kasm.local account, you’ll need to sign out and then sign back in with user@kasm.local.
Once you do, your Workspaces dashboard should look like this:

Clicking on Edge will bring up this browser inside of your browser, and you’re ready to go!

Clicking the blue tab on the side of the screen will bring up an options menu. Some of the features include being able to send files from the container to your computer (and vice versa), the ability to enable/disable peripherals like webcam and microphone, adjust image quality, and —get this— stream a weblink of your session using a sharing link (viewable by other authenticated KASM users in your tenant.

From the menu, you can choose to delete a session, or you can exit back to Workspaces and keep the session alive for a limited amount of time. Once you exit the Workspace with an active container, there will be a thumbnail of the container on the Workspace, from which you can resume or end the session.

If setting up KASM for shared usage, there are some settings in the admin side you may want to look at, including ensuring that logging is enabled and possibly turning on content filtering.
Next Up
Next time, we’re going to look at accessing KASM from the cloud — either using a Virtual Private Server (VPS) like Linode, or exposing your local KASM instance externally using a service like Cloudflare.
Licensing
Self-hosted KASM Workspaces Community is free for non-commercial, non-profit, or personal use. Professional is $5/user/month (minimum of 10 users), and enterprise is $10/user/month (minimum of 10 users). Cloud hosted KASM Workspaces starts at $5/month for a single user (up to $25 a month for added container options beyond browsing), or starts at $18/month for Teams and $25/month for Enterprise.
Resources
https://www.kasmweb.com/