Apples in Intune - Getting Started
Tutorial on setting up Intune to manage your apple devices... the first in a three-part series.
Introduction
This article is going to be the first in a three-part series covering apple devices in Intune. This article is going to cover how to set up Intune as your MDM in Apple School/Business Manager, common terminology used regarding apple device management, and some general tips for anyone who is new to managing apple devices with an MDM. The other two articles will cover managing and enrolling MacOS devices and iPadOS/iOS devices.
One misconception I had early into my IT career was that apple devices are made purely for personal use and would not work well in a corporate/organization environment. And maybe that was the case in the past, but with Intune you can manage your apple devices in the same portal that you know and love for Windows management, making them much more approachable in this scenario. After enrolling and managing a full computer lab of macs and starting to embark on enrolling our iPads into Intune, I have learned a lot and I wanted to write the article(s) I wasn’t able to find in my google searches.
Apple’s fun list of acronyms and terminology
ASM/ABM - Apple school manager or Apple business manager. This is the portal for managing apple devices you have purchased with either a school or business account. As far as I know, they are effectively the same portal, but I only have experience with ASM. In these portals you can assign devices to a mobile device management solution (such as intune), purchase apps in bulk to then push through the MDM, and many other things. It is what gives your MDM control over your devices.
MDM Push Certificate - This is what allows you to manage apple devices using an MDM. It is a certificate that you have to update once a year to give your MDM access to your ASM/ABM Devices. It is very important to keep this up to date!
DEP - Device enrollment program. This is effectively Autopilot for apple devices. It allows you to assign devices to an MDM server for management, before you receive them from ASM/ABM. Once they are tied to your MDM, you can create a profile to configure the setup of your apple devices.
Enrollment Profile - The Intune term for the profile you create to manage the setup of apple devices. This lets you preconfigure specific settings and choose what screens come up during the Out-of-box experience. In other MDM’s I’ve seen this referred to as the DEP Profile.
VPP - Volume purchase program. This allows you to purchase apps in bulk from ASM/ABM and assign them to tokens. You can then import those tokens into your MDM and push apps from the app store to your apple devices without the user needing to sign into an apple ID on their device.
Configuration Profiles - This is the intune term for a profile you can push to apple devices to configure settings, after they have been set up. This is how you will configure device restrictions, point your macs to AD for login, and change various other settings. In other MDM’s I’ve seen these referred to as just ‘profiles’.
.mobileconfig - This is the file extension of custom apple configuration profiles.
Adding Intune as an MDM
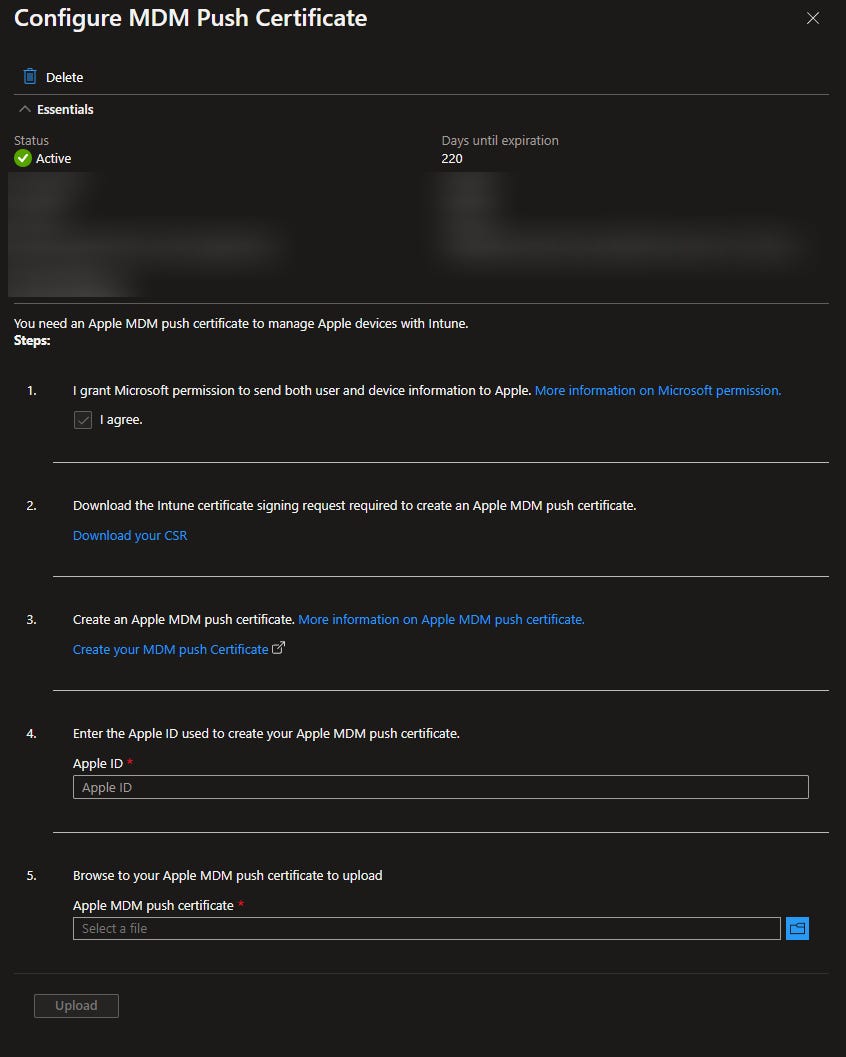
The first thing you need to do to get started is make Intune your MDM for ASM/ABM. I’m not going to go over the entire process for setting this up, but in a nutshell, you go to Intune, navigate to the Configure MDM Push Certificate (Under devices > MacOS or iPadOS > Enrollment > Apple MDM Push Certificate). Here you have to effectively pass certificates back and forth between ASM/ABM and Intune.
Intune makes it a lot easier than most MDM’s and there’s some great documentation from Microsoft on it, so I don’t feel it is necessary to go into great detail on it. It is fairly self-explanatory.
Overview of Management Process
Once Intune and ASM are friends, here is what the overall process is going to look like.
You enroll a device in apple school manager (this can be done by either purchasing the device through your school/business account, or a manual method which I will mention later in the article)
Sync Intune with DEP so it will recognize the device as a part of your organization.
Assign an enrollment profile to the device (this can be automated by setting a default profile in your MDM).
Go through the out of box on your device. It will eventually get to a settings page called Remote Management. This is where apple applies the profile to your device and enrolls it in your MDM.
After this you can assign the devices to groups, push apps and settings to it, and much more.
Device Management Overview
After the device is enrolled, you will need to make sure you are assigning devices to Intune from ASM/ABM. To do this, log into ASM/ABM and click on the devices tab. Here you will see a list of your managed devices. Search at the top of the page for your device by serial number.
Once you find your device and click on it, you will see a ‘Edit MDM Server’ button in the top left. Here you can manually assign the device to Intune.
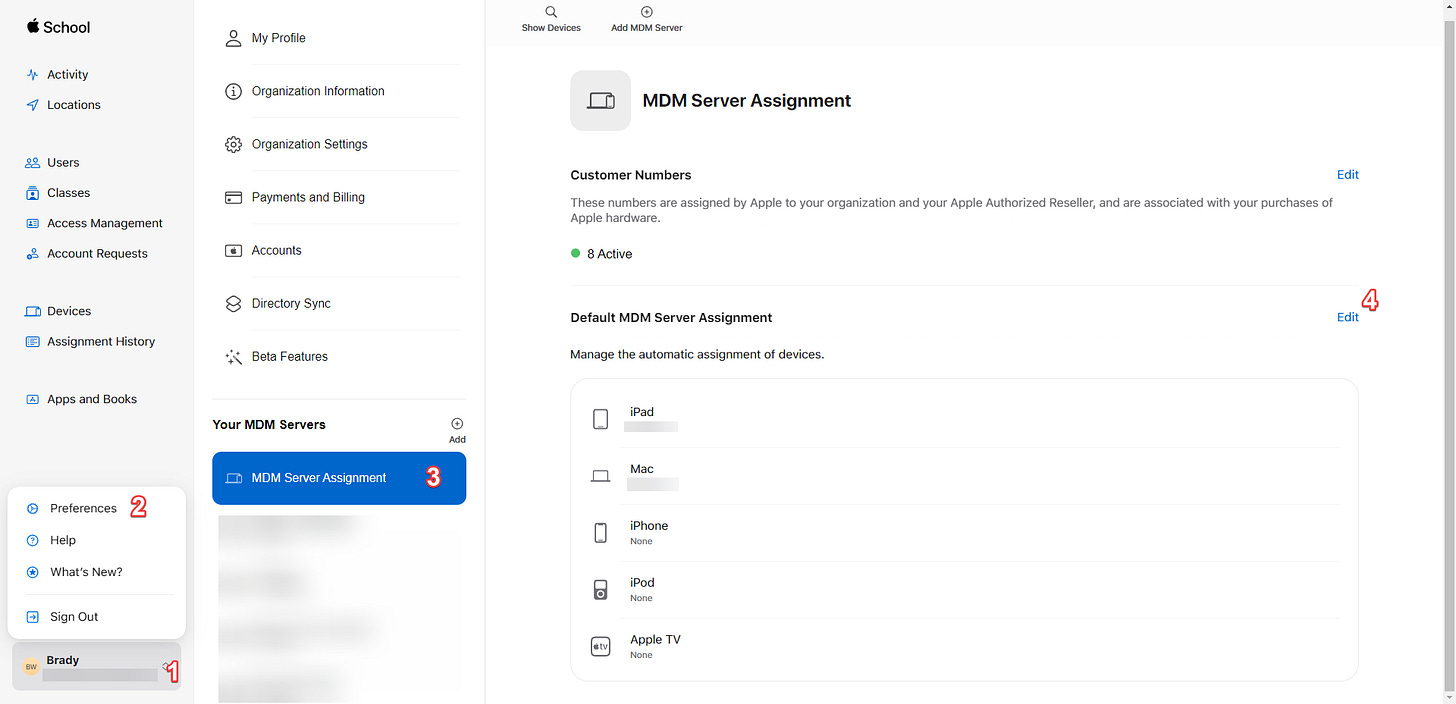
If you wish to have ASM/ABM automatically assign devices to Intune by default, you can go to your profile > Preferences > MDM Server Assignment and then edit the default server assignments.
Once you have added a device to be managed by Intune, you will need to sync DEP, so Intune knows that it has permission to manage it.
To do this, go to the Intune Portal > Devices > iPad or MacOS > Enrollment Program Tokens > You should have a token there after associating Intune and ASM/ABM together, click it > Click on Devices > Click on the Sync button in the top left.
After roughly 10 minutes or less, you should have your apple devices show up here. It is important to recognize that Intune treats MacOS and iOS/iPadOS devices separately. Though the enrollment process is mostly the same for each platform, you will have to make separate settings profiles based on platform.
I’m going to go into more detail on what you can do on each platform in future articles, but it is important to know that any settings profile you make is going to be specific to the device type you are pushing it to. This means if you plan on managing both iPadOS and MacOS devices, you will need to configure the settings for each.
It is also important to recognize that if you have an apple device that is already set up and then enrolled into Intune, it will not be able to be managed until after it has gone through DEP. This means that if you want a device to be managed by Intune, you will need to factory reset it and make sure it goes through the remote management page. If the device is brand new out of box, then you should be able to go through the set up and proceed as normal.
App Management Overview
It is important to note that this only applies to apps in the app store. If you wish to push a program to a MacOS device (.pkg or .dmg file) there is a separate process for that. It’s also important to note that though the process for pushing apps to an iPad vs a MacOS device are the same, if you try to push an app that is only compatible with iPads to a MacOS device, this will not work, and vice versa.
To get started with pushing apps to your devices, you will need a VPP token. This can be found in ASM/ABM under your profile > Preferences > Payments and Billing > Content Tokens. By default, you will have a token named after your organization. If you wish to create more content tokens, simply create a new location in ASM/ABM and a new content token will automatically be generated.
Once you have a content token you wish to make available in Intune, click the download button beside it. This will download a .vpptoken file. You will upload this to Intune to give it access to the apps you assign to this token.
To do this, go to the Intune Portal > Tenant Administration > Connectors and Tokens > Apple VPP Tokens > and click the create button.
Here you will create a name for it in Intune, associate an Apple ID with it, and upload the VPP token file we downloaded a moment ago. Note that this also needs to be renewed once a year, but is not the end of the world if it expires, when compared to the MDM push certificate.
Next, we can go back to Apple School Manager and purchase copies of an app and assign it to this token. To do this, go back to ASM/ABM > Apps and Books > search for the app you wish to add > On the ‘Assign to’ box, click your VPP token from the list > Add your quantity of apps you wish to purchase (for best practice, do not over purchase apps. This will slow down your VPP syncs) > and lastly click Get.
When you do this, it will not be immediately available to push through Intune. You will need to sync your VPP token before Intune knows about the new app. By default VPP tokens will sync on their own daily, but you can manually sync the VPP token by going to the Intune Portal > Tenant Administration > Connectors and Tokens > Apple VPP Tokens > then right click on your token and click Sync.
After you click sync, you should be able to find your app available to push to a group in the Apps section of intune after just a moment.
From here, we can assign this app to our device groups.
This concludes the basics of getting started with Apple Devices in Intune. Stay tuned for the upcoming articles for managing iPads and MacOS devices!


