Add a Custom Domain for Your Email Address Using iCloud+
You can also share your custom domain with up to 5 other users
My on-ramp to working in technology was doing web design in the late ‘90s. I first started by publishing pages on GeoCities (RIP), but when I graduated to hosting my own webserver I stumbled on an addiction that still plagues me today: purchasing custom domains. Whether purchased for hobbies, business, or school, the allure of having an email address at a custom domain has always appealed to me. However, with the explosion of spam and phishing in the early 2000s, being able to host your own mail server has gotten more and more difficult, and in most cases today hosting providers prevent users from being able to send and receive mail. That leaves the most common option as having to subscribe to a service like Google Workspace, Amazon WorkMail, Office 365, Proton Mail, etc., with an additional cost per user, usually around $8/month/user for basic features. When you just want to have a cheap and easy vanity address, that becomes cost prohibitive very quickly. The easiest server-free solution I’ve found so far is a perk for Apple users who have an iCloud+ subscription. Starting at $1/month, I feel like even without the storage, that’s a great deal for iCloud Private Relay, Hide My Email, and Custom Email Domain support. The steps below assume that 1) you’re already an iCloud+ subscriber and 2) you do not already own the domain you want to use. If you don’t have iCloud+, signup is quick and easy, and doesn’t require you to be an Apple user. Steps for setting up an iCloud account can be found here, and upgrading to iCloud+ can be found here.
Let’s Gooooooo!
Login to your iCloud account, click on the Apps link in the upper right-hand corner of the screen, and select Custom Email Domain.
Select Buy a New Domain. If you already own the domain, you’ll need to be able to verify ownership of that domain by receiving a verification email. Accordingly, if you’re swapping from another service to iCloud+, be sure to do the verification before you start the transition. Once you verify the domain, you’ll be provided with details for updating some DNS settings for your domain. Updating those records varies widely based on your provider, but essentially involves adding TXT, CNAME, and MX records to your domain using values provided by Apple.
Walk through the process of searching for and selecting a domain name:
Next, you’ll be re-directed to Cloudflare to complete the purchase. Note that at the bottom “Automatic Setup” is indicated. This means Cloudflare and Apple will handle setting up the DNS records for your domain. If you already have a Cloudflare account, you can sign in using those credentials. Otherwise, use your Apple account.
Cloudflare will walk you through the registration process, which will primarily involve selecting the term of your registration, enabling automatic renewal if desired, and filling in your contact information. Currently, the .uk is the cheapest top-level domain available at $4.94/year. At $9.77/year, the .com registration price here also beats AWS’s current price of $14/year.
After completing this step, you’ll get an “All Done!” and a link to click to return to iCloud.
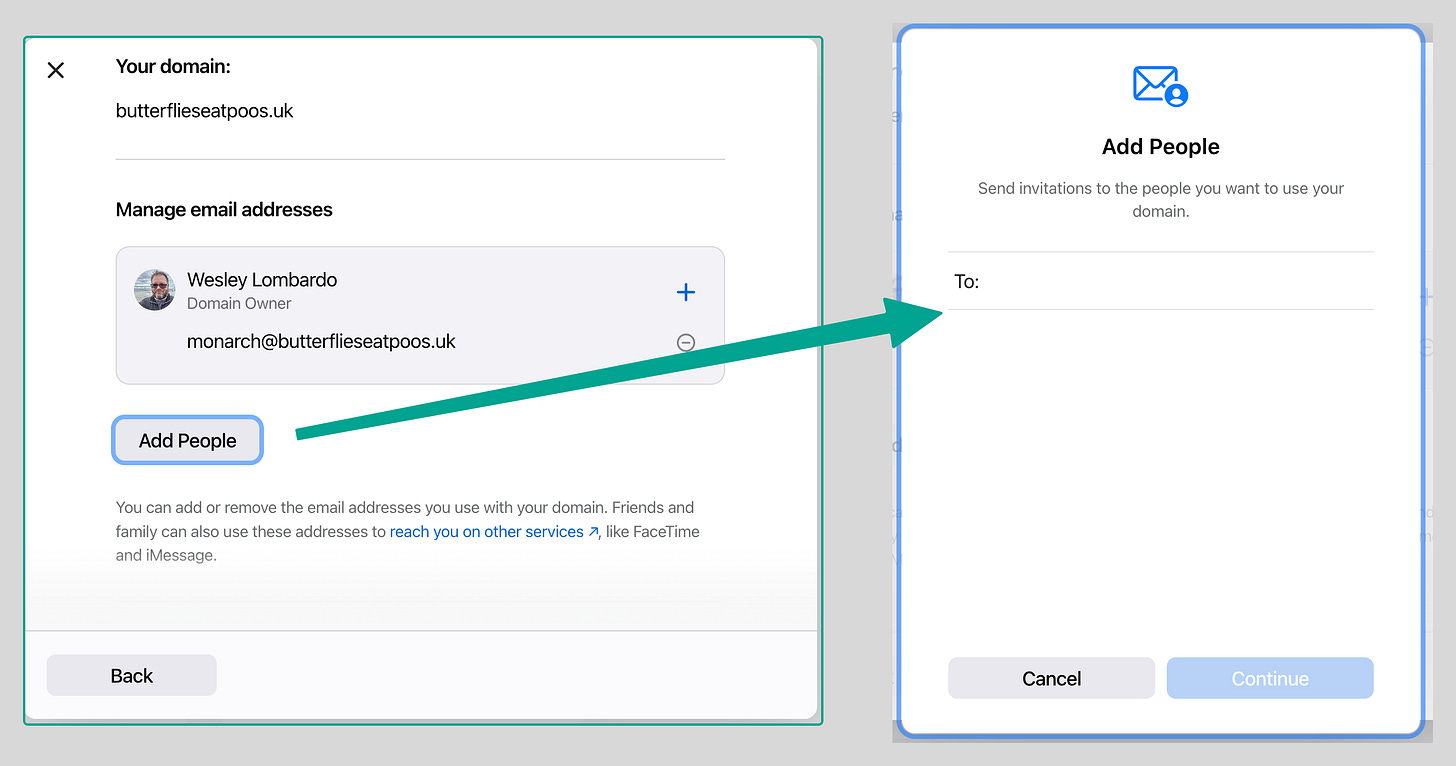
Back in iCloud, return to the Custom Domains link in iCloud (from step 1) and select the custom domain you just added. It will then ask you if you want to use the domain for just yourself, or share it with others. You can select people on your family plan to share it with, OR you can invite someone else who isn’t connected to your family plan.
To add your address, click the plus sign next to your name and enter the email address you want at your new domain.
The only tricky part about inviting people outside your family plan is that when setting up the domain to be shared, it always defaults to having you select people on your family plan, and since you can only share with a max of 5 people, if your family plan is full, it doesn’t give you the option to add someone new. The fix is to hit the minus button next to the members of your family plan that you don’t want to share the domain with. Once you’ve cleared space, you can then add external users. And no worries — you’re only removing the family members from that specific custom domain, not from the family plan.
After clearing your unwanted family members (HA), an “Add People” button will appear that will let you enter a phone number or email address to send an invitation to. The address DOES need to already have an Apple ID tied to it.
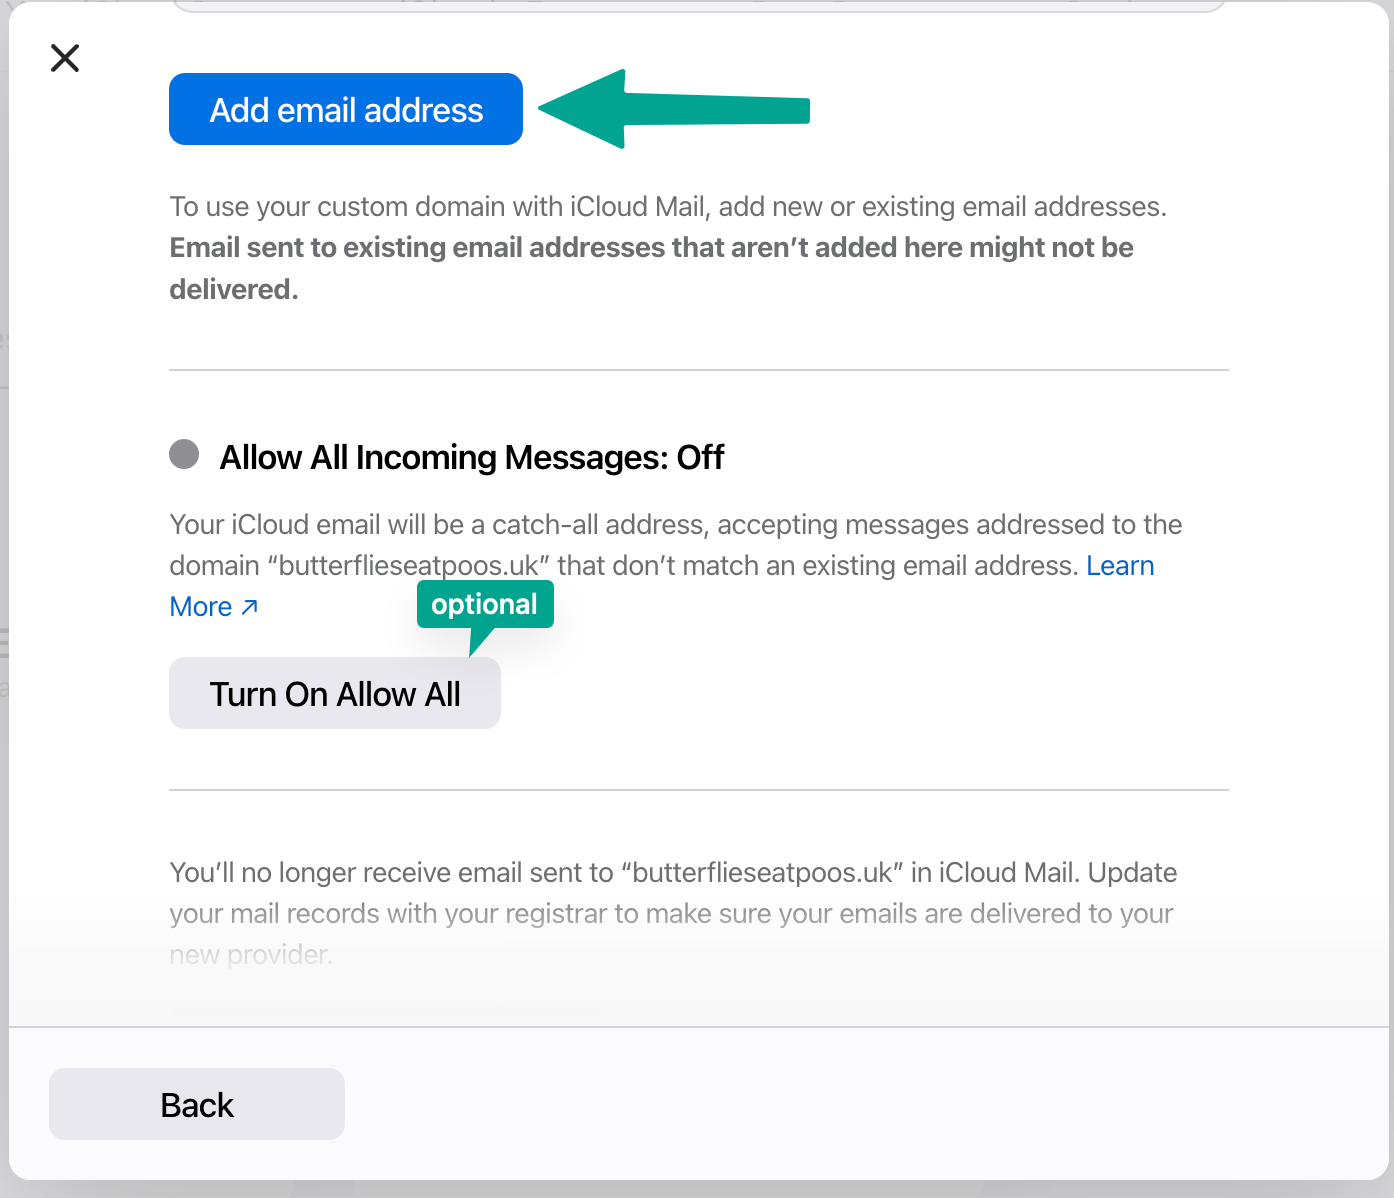
After you have the users and addresses filled in appropriately, scroll down and select “Add email address.” You can also configure it so that you receive any emails delivered to your domain that are incorrectly addressed.
That’s it — once you hit “Add email address,” your iCloud account now recognizes your new address. After the users you invited to join accept the invitation, they’ll be able to use their address through iCloud as well. If you’re on a Mac/iPhone/iPad, that means an annoying pop up asking if you want to use the address for Facetime, etc. will be popping up momentarily.
Additional Notes:
If you already have a domain name purchased, the steps are similar to above. The main addition is that you will have some DNS settings to add to your domain with your domain registrar (AWS, GoDaddy, etc.). The steps are straight forward — adding TXT, MX, and CNAME records — but they will vary widely depending on your registrar.
If you are transferring a domain from a current mail server, remember to verify your email in iCloud BEFORE discontinuing use of your old mail server.
Finally, if you have a domain that you do not have mail set up for, I’ve not found a way to manually set that up in iCloud. Admittedly, I didn’t dig too hard into this because I have a Proton Business account that lets me add custom domains, so for parked domains that I want to add mail for, I just have to add them to my Proton account, get the iCloud verification email, then migrate it away from Proton.


